
This achievement rewards the Red Proto Drake mount.
Ahn’kahet: The Old Kingdom
Ahn’kahet: The Old Kingdom, or simply called OK, Old Kingdom, or Ahn’kahet. This instance has several achievements, is long and perhaps one of the most obnoxious of them all, aside from The Oculus. There are several achievements to get in this instance, and yes, you can get all of them in one run.
Respect Your Elders
This achievement is a little technical. The Guardians provide Elder Nadox with a buff that makes him immune to damage if they are too close. For this achievement you need an offtank, and I suggest you make that person a Paladin.
The best way to do this achievement is to make your way past the boss without pulling, and clear the room just beyond. Once you’re ready, have the boss pulled and taken across this room to the stairs at the far end. All DPS tank the boss here, and have the off tank stand at the exit of the Boss’s room itself, ready to pick up the adds as they spawn. This keeps the Guardians away from Elder Nadox, and thus keeps him from going immune. However, the offtank will take some pretty hefty hits. I’d recommend they be stocked up on potions and ways to heal themselves beforehand as it can get pretty tense towards the end.
Below, I have including a map for reference, with point A being where Elder Nadox is tanked and point B is where the offtank sits. It’s actually fairly easy to get past the boss without pulling him, so you shouldn’t have any problems there.
The Party’s Over
There are two methods to attaining this achievement. The first is obvious. Run the instance up to this point with only four people. The other method, and the one I recommend, is to bring along all five people. Right before you engage this boss, uninvite one person. You then have one minute to kill the boss and reinvite the fifth person before they get ported out. The only down side to this is the simple fact that only four of you are in the party at the time of the kill, and thus, only for of you will get the achievement. How do you solve this so people don’t get butt-hurt over it? Bring someone along who has the achievement.
The person who is uninvited, mind you, can also be targeted. They can pull aggro, they can be the focus of the life-drain ability, and they can die.
There is no way to start the fight with this person in the party, and you can’t invite them before the boss dies. There are several times during the fight that the system checks for the number of party members. It’s safest to just leave them out for the duration.
Volunteer Work
This achievement is a dps race, and a little heal intensive simply because of the 200% damage buff that Jedoga gets when she sacrafices a volunteer. There is one method where, after you pull her and she calls forth her first volunteer you jump down the waterfall then run back up to the side, and then by the time she gets to you the buff has worn off since it only lasts fifteen seconds. You then continue to tank her there and she’ll run back and sacrafice another volunteer, lather, rinse, and repeat. However, I don’t prefer this method.
I prefer the straight up tank and spank method. Your healer would have to heal the tank through the increased damage, but that shouldn’t be a problem. Choose whichever method fits your preference, really.
Volazj’s Quick Demise
On the topic of a DPS race, this is a difficult one. The most interesting part, and most crucial, are the insanity phases. You know, where you get pulled into another realm and have to kill the party, a problem for healers. There are a number of ways to achieve this. Right before an insanity, have a Paladin DI someone, effectively taking them out of the equation. I don’t like that method. Seems to me that too much can go wrong, plus I’ve never seen it done.
The way I would recommend you do this achievement would be to simply suffer through it. A note, however. The adds don’t exactly have that much health. Holy nova works wonders. So does mind flay if you fear them first. Being that I’m a priest, I couldn’t give you details about shortcuts for other classes. The whole lack of experience thing.
There you have it. An instance down. While you’re here, might as well stop by the next instance.
Addendum by Pall – End Time Prophets
So. Some quick facts: Yes, you have to deal with the insanity phase. Yes, it sucks. Wonder why that damn holy paly you brought’s clone is such a pain in the butt? After doing this enough times, I figured it out: What your clone does is based entirely on your spec. A holy priest or holy pally will spam the ever living hell out of their fast heals. A shadow priest, however, will do nothing but spam mind flay. So, I decided to write this up.
- Warriors: Will do nothing but attempt to hit you in the face, regardless of spec. They don’t stun.
- Rogues: See warriors.
- Hunters: Hunters will RUN FAR AWAY and then shoot you. These are /annoying as sin/ to have in your group, as you have to chase them down. don’t bring too many.
- Shamans: Resto shamans will heal. Enhance shamans will run up and hit you in the face. Elemental shamans will sit where they are and /use thunderclap on you, /knocking you around. They’re a mild nuisance, but not unbearable.
- Paladins: Tank and ret pallies will smack you in the face. Holy pallies will do nothing, /nothing, *nothing*/ but spam Flash of Light on the other clones. Nothing. That’s all they do. These are annoying as all sin. Make sure your pallies have dual spec and make them go ret or prot, it does not matter which. Just do NOT let them be specc’d holy for this fight.
- Priests: Disc, I assume, will bubble all their friends and heal. Shadow will do nothing but mind flay you. Holy will spam heals. Make sure your priests are specc’d shadow.
- Mages: Nothing of concern. If they have blast wave they could annoy you.
- Warlocks: See mages.
- Death knights: See warriors.
- Druids: Boomkins will boomkin you. Trees will heal the group and piss you off. Feral, regardless of cat or bear spec, will turn into a night-elf cat (Regardless of side), and try to eat you.
Volazj doesn’t hit that hard. In fact, his most damaging attack is Mind Flay, and if your tank is a Warrior, this is EASY as he just spell reflects and shoves 10k down the boss’s face.
It’s important to iterate again that what your clone does and how annoying they are is determined by your /spec/, not your gear. It’s the exact same as how your spec is determined in your actual dual spec tabs: If you don’t have the 51 point talent, you’re not exactly “Frost” or whatever. Typically the 51 poitn talent’s great and people get it. Make your Holy spec or Resto spec players spec DPS and just spot heal the tank.
Azjol-Nerub
Watch Him Die
There are two ways to do this achievement, both are extremely heal intensive. I’d recommend two tanks.
The first method is the nuke method. You go in, you run up and kill the boss as quickly as you can, having the second tank pulling aggro of all three watches and their minions away.
The second method is the one I would recommend. Pull the three groups as normal, using single target DPS to take out the smaller adds. The first tank then pulls those adds up the hallway and LOS from the room the boss is in. The healer stays in range to heal the tank, and the offtank, who then picks up the boss as all DPS goes to kill the boss.
There really is no other way to do this achievement effectively other than to find unique ways to tank the boss and adds so that DPS doesn’t have to worry about being webbed. Usually the Watchers won’t web the tank… just the healer. Good luck on this one.
Hadronox Denied
There are a number of ways to attain the achievement. Firstly, you can have a hunter in your party. If you don’t have a hunter party, then I suggest bringing someone that has this:
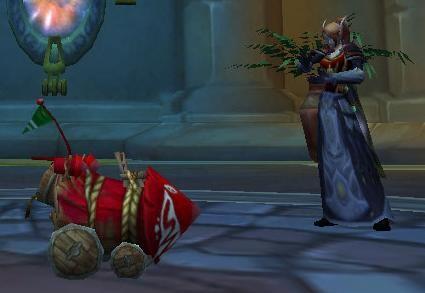
Yep! A Crashin’ Thrashin’ Racer!
The goal is to aggro the first set of elites when you get in the room then have the room reset, thus leaving Hadronox all alone down in his (her?) little alcove, with no adds to worry about killing. How this works is to send the Racer (or hunter) in and it will aggro the elites and be destroyed (or the Hunter feigns death). You can send another party member since you will leave combat after the instance perceives a ‘wipe’ and resurrect them but time gets short. Using the Racer, you’re sure to go in, aggro the elites, and reset the encounter. Positioning of Hadronox is the next most important thing.
Shortly after the reset, adds will start to respawn. Things to note are that Hadronox heals by eating the adds and poisoning them. On the same note, the adds aggro onto the first thing they see. The party needs to use both aspects to their advantage. First things first, you get down into the room and aggro Hadronox.
The party needs to get on the far side of the room with Hadronox positioned between them and the opening where the adds will enter the room, also where you just came from. The tank needs to position Hadronox so that the first adds come in and immediately aggro to him/her and the boss. Hadronox will poison them, which takes the aggro off. Turn then so that Hadronox is faced to the side.
The adds will continue spawning, but they will follow the aggro path right to Hadronox. Watch the health quickly disappear. Hadronox quickly gets killed.
It is extremely important to note, now, that the way this achievement works is not so simple that Hadronox can’t web the doorways, woops, it happened, reset. If the doorways are webbed at all during the instance, plan on trying for the achievement the next day. A reset does not reset the fact that the doorways were webbed. Positioning of this encounter is a little difficult to explain via text.
Gotta Go
Flat out DPS race. There isn’t anything to really do that’s special here. Just DPS the boss, and if possible, if it’s a priest healing, have the priest toss up some dots, or maybe even some smites and holy fires. Afterall, a few Renews should be all that’s needed, maybe the usual Flash Heal. A holy Paladin could even do some melee dps. Or you can just let the healer heal and DPS through the fight. It’ll work either way, just make it 4 minutes or less.
Caverns of Time: The Culling of Stratholme
There are two achievements in this instance, both fairly simple. You cannot get both in the same run. Or at least, it’s unlikely.
The Culling of Time
This achievement is often referred to as ‘CoS Timed Run’ and ‘CoS Mount Run.’
You have thirty minutes to get to the Infinite Corruptor, starting from when you begin actually killing waves. There is a timer displayed in game. There’s no real strategy except to either know where the next wave will hit and just run back and forth in the down times, or you can just follow the instructions. As long as you don’t wipe, don’t waste time standing around or eating/drinking you’re fine. Of course Arthas is slow, so you can eat and drink while waiting for him to show up. Reward, aside from the achievement, is a chance at the Drake, which is a 100% drop rate.
Zombiefest!
Fun achievement. A few things you will want to do before you actually attempt this achievement. Zombies stop spawning once the second boss is killed, and killing any zombies from that point on will cause problems for this achievement. Also, with 100 zombies being killed at the same time, you may experience the same thing my group did. The instance will crash. Luckily for us, when we came back in, we went back and found that we were dead and the zombies had reset. I can’t say that you will be lucky if that happens to you, so better safe than sorry. What we did the second time around to ensure we wouldn’t crash, we turned off display of scrolling text for heals and damage done, as well as effects. Basically we couldn’t see the health of the mobs, no nameplates, none of that. It worked relatively well.
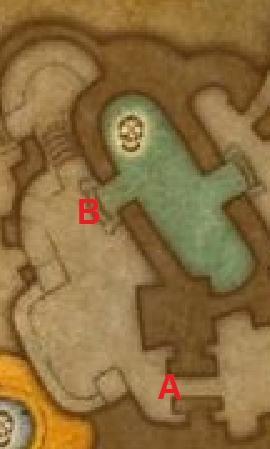
I have included a map to help with some visual reference points.
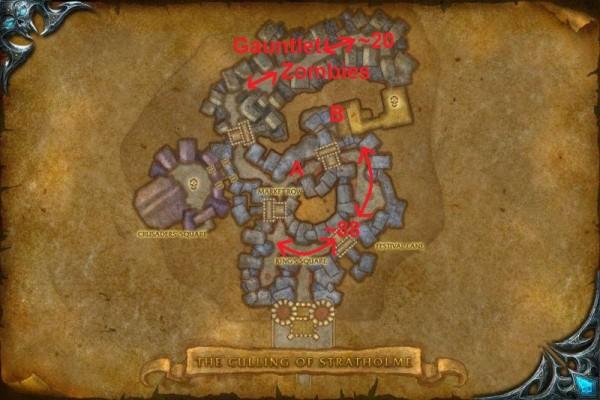
Recommended tank would be a Paladin and a healer with instant heals.
Point A on the map is where the timed run ultimately takes you, otherwise you can ignore it. Point B is where you kite the second boss to. The writing was more clear when I edited the image so I apologize.
Otherwise, in the beginning part of the instance there are about ~88 zombies if you kite the boss appropriately, and then you only need ~20 or so on the other side in the ‘gauntlet’ region. You only need to get the first few, but keep the group moving in case you fall short so you can quickly get to the next pull.
What you need to do is take the second boss, when he spawns, all the way into the inn and kill it there. However, before you actually KILL the boss, wait for about a minute or two, doing just white damage. This ensures that as many zombies as possible will spawn outside the inn in the streets prior. Then feel free to kill the boss.
Continue through the Inn and kill the next boss, and open the passageway to the Gauntlet.
Before you talk to Arthas to start the next portion of the instance you will then want to round up 100 zombies.
Each zombie only has about 700 health, so it is imperative that any type of damaging effect is not to be used until all of them are rounded up. We used a Paladin tank on our run.
Have the tank run out and round up by body-pull all of the zombies in Festival Lane (the road before the inn, all along the roadway. If the healer runs with the Paladin (recommended) make sure that both the tank and healer understand that anything, spell casting included, will cause aggro. So if the Paladin needs a heal and, say, your priest casts a renew on him, make sure he then casts a heal on himself or on the priest to regain aggro. Even casting Power Word: Shield pulls aggro.
The zombies are a little slow, so don’t worry when your tank and healer return, they will be following. Once the zombies start appearing, have the tank start rounding up the last 20 or so. Someone should make sure to have the achievement tracker up to monitor the numbers. Have fun AOEing them down!
Drak’Tharon Keep
The achievements in this instance are somewhat touchy and require a bit of knowledge of the fights before you attempt them. During the instance, not the encounter, these achievements cannot be failed. Let me explain on each one.
Consumption Junction
Trollgore is the big ugly troll at the top of the stairs, and the first real boss in the instance. He is pulled with a set of non-elite adds. During the encounter for each add and party member in his line of sight, he will get one stack of consumption. This happens every fifteen seconds. So unless your DPS is so leet you can get him down in less than thirty seconds, you’re going to have trouble. Even then, when we tried to just burn him down, he hit ten stacks a split second before dying.
This is why I would recommend a different method, one that’s been tried and proven easy. What you need is an offtank.
Have the offtank, during the pull, take the adds at the top of the stairs. Pull Trollgore down the stairs and to the doorway into the room. Have the tank face him out of the room with the healer and other dps standing behind the pillars. Every fifteen seconds after he gains a stack of consumption have the healer and dps pop out from behind the pillars, do their stuff for about five seconds, then pop back behind the pillars. This way every fifteen seconds he only gets one stack of consumption since he only ever sees the tank. The explanation is a little hard to picture.
Oh Novos!
This is perhaps the easiest and least buggy of all of the achievements in this instance. Have an AOE offtank tank the adds that continually spawn at the top of the stairs from whence they come. Meanwhile, the maintank and other DPS take out the elites on the ground level and worry about the boss. Pretty simple, tank and spank.
Better Off Dred
This achievement made me sad. As it says, slay 6 Drakkari Gutrippers or Scytheclaw during the fight. Easy enough, when you go to pull King Dred you are met with one of his tiny minions. Usually this raptor is killed before the boss pull, and then there are still six more raptors in the pen behind him. Slay them all during the fight and win. Right? WRONG!
We did this. Down to the letter. Did we get the achievement? No. Why? We believe there’s a typo in the achievement text. We believe that it should be read as follows: “Engage King Dred in Drak’Tharon Keep on Heroic Difficulty and slay 7 Drakkari Gutrippers or Drakkari Scytheclaw during his defeat.” When we ran the achievement the following day based on the adjusted achievement text we obtained the achievement.
So then, engage King Dred by just running past the first raptor. Have your offtank pull the first raptor off of the main tank at this time and DPS the raptor down. Then systematically go through the pen pulling each raptor, kill them. After that, DPS King Dred as normal.
Gundrak
Depending on where you start, being that this instance has two entrances, will determine which achievements you start out with. I will, however, start with the traditional entrance, right by the stone. If all you have left is Less-rabi, then head across the way to the back entrance and there you will find quick and easy access to this achievement boss.
Snakes, Why’d it have to be Snakes?
This achievement is a personal achievement so never fear if someone in your party gets wrapped but you don’t. You’ll still get the achievement. A good way to keep people from getting wrapped is to have a Death Knight drop a Death and Decay around the group, or use a Mage’s explosion. Even Holy Nova will help. Any type of AoE.
There is also another method, and that’s to pull Slad’ran up the ramp towards the entrance. By the time the snakes he summons get to you up there, the encounter will end. I have not personally tried this method, but many people in the guild have.
Less-Rabi
This achievement is one of the hardest of all the Heroics. Make It Count in The Oculus is the only other one you’re going to have as much trouble with. There are a few things to know about Moorabi before you begin this achievement’s many attempts.
If Moorabi transforms, simply disengage the encounter and exit the instance, or if you have multitudes of gold to spare, just wipe. Healing is secondary on this achievement so bring a dual class, such as a Shadow Priest who can Vampiric Embrace (which I didn’t even use) or an Elemental Shaman who can drop a Healing totem.
You need high dps, and at least 3 interrupts. I recommend a Warrior tank, a Fury Warrior, an Elemental Shaman in Reverb spec, and a Rogue if you can. Moorabi is immune to silencing and fear effects, and things like Mind Freeze do not work. You need kicks, shield bashes, that type of interrupt. Also, as the encounter goes on, Moorabi’s cast time gets shorter and shorter, as does the time between casts. So all of those rumors you’ve heard that it’s every five seconds? Not true. He’s changed twice in a row for us before.
Timing needs to be perfect on the interrupts. Time them for the split second that Moorabi begins to cast his transformation. Don’t wait for the “Get ready for something much… Biggah!” or you’ll miss it on the third try. You should have the DPS output to down Moorabi before he gets a third transformation attempt. If not, your chances of success drop substancially with each passing second.
That’s basically how it works. A massive DPS race with interrupts that need to be timed perfectly. Careful with dots, because if the boss dies after he transforms because of Dots, you’re screwed. Come back again the next day.
What the Eck?
Believe it or not, some people don’t know What the Eck people are doing to get the Eck Residue. Hard to imagine, but Eck is a boss only available on Heroic. The entrance to his little enclave is right after the Moorabi fight. In fact, hit the switch so you can access the final boss, then turn around with your back to the altar and you’re staring at a small opening in the wall. Eck is that way.
To get the residue, when the tank is engaging Eck, stand behind the tank but in front of the boss. You’ll get spit on, puked on, whatever you decide to call it. This residue will last one hour. If you die, too bad, it’s gone. This achievement is also a personal achievement. All you have to do is defeat the final boss with this residue in your debuffs to get the achievement.
Share the Love
This achievement is technical. Have two healers, one as a dps that can offheal when the healer is impaled. A Priest is great because of the bubble. Throughout the encounter, Gal’darah will turn into a Rhino and impale a party member. Something to note. He will not impale whoever is tanking. Have an offtank taunt the boss as soon as he transforms during this phase until the tank is impaled. Once the tank is impaled, the offtank will leave the boss alone. I recommend not dpsing the boss at all until everyone has been impaled, then just tank and spank.
Halls of Lightning
The achievements in Halls of Lightning are honestly some of the easiest I’ve ever done. I had them all relatively quickly. The only one I didn’t get by accident was Timely Death, and even then, my gear was terribad. Still, you do need to know what you’re doing to be successful, but then, isn’t that the general idea?
Lightning Struck
General Bjarngrim is the first boss in the instance. He’s the big guy that wanders around with a couple Dark Rune Dwarves that has the lightning sparkling around him. Or at least, every other section of his patrol he has that buff. That is the buff this achievement references. As long as he’s charged with sparkling static electricity and doing extra damage, you’ll get the achievement. He won’t cast the buff after he’s engaged, so as long as you start the fight with him buffed, you should be fine.
You’ll need to clear at least three sets of adds to get to him. The easiest way I’ve found to get this achievement is to have the tank hold the boss, while the DPS take out the adds. There’s a lot less damage swinging around that way.
Shatter Resistant
This seems a little difficult to understand. Volkhan seems rather fond of shattering his Golems. However, he can’t shatter what is still mobile. Simple solution, then, would be to just let the adds run wild. Hit them once or twice since they move slower at lower health levels, but it’s easy to just kite them around. Some groups report having even used their healer to kite the adds. If you must kill some, don’t kill more than 3. To be safe.
Timely Death
Most achievements that have the basis of ‘defeat X within Y minutes’ are typically DPS races. What makes this one different? Nothing, really. Except the strategy.
Normally on this fight, the group gets out of the Nova and kites Loken along the little ‘path’ or around the room, whatever the case may be. For this achievement, simply heal through the Lightning Nova. Of course, don’t do this if your gear score sucks or your DPS can’t put out more than 2k. This is just the fastest method. You could potentially make the two minute timer by moving out of the Nova and using massive nukes.
Halls of Stone
Halls of Stone. How I hate this instance. Though not as much as The Oculus. It’s long. Great for mining, though. Anyway, the achievements require a certain level of gear and people to know what they’re doing. More so than usual. If your group can’t pay attention in Naxxramas to know not to stand in void zones on KT, then you’ll probably fail.
Good Grief
Doesn’t this just scream DPS race? That’s really all there is to it. Nuke her, and nuke her hard. There really isn’t a strategy to use. Not that I’ve used. We just went in, dps’d and she died before I even managed to finish two full spell rotations. Should be the same for any group of people with decent gear.
Brann Spankin’ New
This is like those annoying escort quests. Except if the mobs hit Brann it’s over. Have the healer and ranged DPS chill in the room, and have melee and the tank stand in the entrance. Fury warriors and DK’s excell with this achievement because they are the first line of defense… and usually nothing gets past. Only thing to watch for are the fireballs and lasers.
Abuse the Ooze
This achievement is fairly simple. Sjonnir the Ironshaper summons little bubbles of ooze. They come in, wander around, and normally get killed. However if a couple of the oozes merge together, they form Iron Sludges. These things hit hard. Heals needs to be on top of it. Basically white damage or no damage until an Iron Sludge appears, kill the Iron Sludge, then wait again. This achievement is similar to Share The Love. You’ll probably have more than five show up before you fully kill Sjonnir, but either way. Kill 5, win.
The Nexus
The Nexus has a few achievements that are heal-heavy and require some coordination before you get started, but they are otherwise relatively easy.
Firstly, if you want to try for all achievements in this instance in one run make sure you have someone who can mass dispel. Otherwise with simple coordination you should be fine.
Split Personality
This achievement is fairly straight forward. Twice during the encounter Telestra will shift out and be replaced by three mirror images. Don’t waste time marking them. Instead, just use V to show their health bars. It’s easier.
There are two ways to do this fight. You can AOE them down if you have a Mage, Warlock, and/or Boomkin, or you can go the safe route and DPS them down one at a time to about 10% then AOE them. Five seconds isn’t that long, so make sure you know what the DPS output is capable of before you begin this fight.
You need to repeat the process the second time the images appear as well, so it’s the same thing again.
Chaos Theory
 Pain. In. The. ***. You may wipe once or twice until everyone gets positioning down. Single target damage ONLY when mobs are anywhere near the boss or the tank. If they’re in the group, that’s different… still I wouldn’t recommend it.
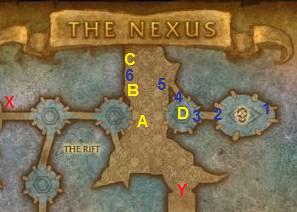
Okay, start simple. Here’s a map. I have done you the benefit of marking 1-6. You shouldn’t need all 5 positions, but just in case.
First step, clear ALL trash around the platform. They’re marked as A, B, C, D.
You can approach this boss from two entrances to the Rift. These are marked X and Y.
Things to keep in mind. Adds will spawn as long as someone is near the rifts. Lots of adds. The tank being closest ensures the least number of wraiths. Wraiths have unlimited range when Chaotic Rifts are spawned and can attack any and all members that are within line of sight. Rifts also will chain lightning. At all times, keep the tank between the group and the rifts.
Firstly, have the tank aggro the boss and pull to position one, witht he boss facing away from the group. Everyone should use /range to ensure that they are at least 15 yards from the tank, the range of the chain lightening.
When he spawns a Chaotic Rift, all melee and casters go to position two, the healer staying within range to heal the tank. If need be, melee and ranged DPS can single target down the wraiths that spawn. Some may slip free.
When the boss again becomes targetable, the tank will then kite the boss to position two as the group moves down the ramp to position three.
The same type of movement will be required. Position three may be a little farther onto the platform, based on where the tank positions himself. Remember, fifteen yards from the tank, not the boss.
The turn from the platform to the base will cause some problems with positioning. You may need to adjust positioning to ensure everyone makes it out alive. There is a small pillar on the left side of the ramp at the top. If the tank stands there and ranged is about at the number five on the map, things should be golden. The whole point is to keep the tank between the group and the rift that spawns at position one. If needed, kite down the ramp to position five, moving the group to six.
It is very important to note. Do NOT jump off of the platform from D to A. This will bug the boss and LOS the healer from the tank and if any adds get past the tank, bye bye heals if they stay on the platform.
Yes, to clear up any confusion, the “Chaotic Rifts” that are amongst trash mobs do NOT count towards this achievement. With one exception. If you kill one during the encounter, it’s game over, you lose it. That’s why I recommend clearing A-D.
Intense Cold
This is a personal achievement, so it’s relatively easy to attain. There are several ways to do this achievement. Easiest is to bring a priest along, aside from the healer. If the entire group needs the achievement, the best way to do it is to have all DPS stack on the priest, at Keristraza’s side as the tank stands in front. Everyone keep jumping. Occasionally there will be an iceblock that will glue people to the ground, and typically this is where the failure occurs.
Simple solution. The extra priest focuses on using Mass Dispel on the group. You get frozen, mass dispel. When I did this, I didn’t even DPS.
You can also bring any other class that can dispel and have them manually dispel individuals. Again, this is an individual achievement so it doesn’t matter if someone else gets three stacks, so long as you don’t get more than two yourself.
The Oculus
Firstly, I hate this instance. With a passion. With Patch 3.2 the character gear score will add health to the drakes, so that’ll be good, but the achievements are a pain. You cannot get them all in one run. It’s impossible. Literally. I’ll start easy, but in no particular order, since they are all fairly general achievements.
Now one thing needs to be made perfectly clear. If you leave the instance at any time after obtaining a drake. You lose your drake. You must reobtain it. If you die and are resurrected, you lose your drake. You must reobtain it. This makes things difficult and annoying on Make it Count runs. Sometimes jumping to your death will make you lose your drake so I’d recommend just letting mobs rape you if you are all wiping it up.
Things to note about the instance in general. The flying drakes have a large aggro range. The whelps have a large aggro range. They do not have unlimited range, if they’re trash mobs, but they DO have unlimited range on the boss fight. I’ve found it easiest to kite Mage-Lord Urum clockwise around the platform. Go Counter clockwise to avoid the Planar shifts on the final boss fight. I will upload a map and a video for reference.
Experienced Drake Rider
Just as it says. Finish the instance three separate times on a different drake. This is actually quite simple.
Drake abilities change, and you have time to learn them because you wil be doing voids anyway.
Next, come the Voids. It is possible to do two at once, and I will post those strategies after posting the traditional strategies for each achievement. For the Voids, it is only on the final battle so you can have a red drake for trash pulling up until Eregos, but I would recommend just use the drakes you’ll be fighting with. It makes it easy so you don’t have to go back and replace it.
Ruby Void
This achievement is fairly simple. I recommend using a combination of 3 Ambers and 2 Emeralds, though you can easily use 4 Ambers and one Emerald.
When engaging Eregos, the tactic that works the best is the “Shocklance Ping-pong.” This tactic employs large amounts of damage. I’ll use five people from End Time to make this example.
Tede is our main tank. Pall, Cantrenam, and myself are DPS. Bliss is healing.
Before we down the first boss we all agree that Tede, myself, and Pall will ride Amber drakes. (If doing the 4-1 then Cantrenam will ride the fourth.) Bliss and Cantrenam are on Emerald drakes. (Or just Bliss.)
We are all in vent because we need coordination. Pall volunteers to take the first shocklance. We also organize who is doing timestops. Pall, Tede, Yarf, (Cantrenam).
Pall starts off by starting the shocklance. This doesn’t pull aggro. Then Myself and Tede (and Cantrenam) begin laying into him. When the shock charges stack to 10, Pall calls out ‘switch.’ Tede and myself (and Cantrenam) then switch to shocklance and Pall begins to dps Eregos. It takes one or two hits and we all have 10 stacks as well. Pall calls out switch. He uses Shocklance and Tede and myself (and Cantrenam) switch back to DPSing.
About 10 seconds into the fight, perhaps a little longer, Eregos will summon whelps. Without a ruby drake, they will kill us. Rapidly. So we use our first timestop. The second timestop will be used, probably, right before the first planar shift. Eregos is affected by diminishing returns so it is possible the third one will have no effect on Eregos, if used too early.
When Eregos shifts into the Astral Plane, everyone migrate to the right, counter-clockwise, to the next platform. Go to the far edge of the platform to avoid the bombs. As Eregos starts coming close again, begin the shocklance once more. At this point, the third timestop will be used and the first one (or fourth) will be available for the next summoning of whelps. Lather rinse repeat. Fairly simple.
Emerald Void
This one hurts. However, two ruby and three amber drakes makes this a breeze. Employing the shocklance technique described above, there really is no difficulty. Keep the two tanks alive, alternating Martyrdom between the two will help.
Amber Void
This one was also easy. Using four ruby drakes and one emerald, or three ruby drakes and one emerald, it’s a longer fight without the shocklances and no timestops, but it is easy. Alternate using martyrdom and dps Eregos.
Okay, so you think you’re leet? Want to try for two achievements at once? Alright.
Amber and Emerald Void: Tactic. 5 Ruby Drakes. With no heals and no timestops, this is going to be a pain. Basically, the goal is to own him epically. He hits hard, so if you have a priest in the group, have everyone mount on one of the platforms just before pulling the boss. The priest buffs the drakes, then mounts themselves. The priest will have no buffs on their drake so make sure they don’t pull aggro.
Alternate tactic is to have one priest in the group that is NOT mounted during the final fight only healing the drakes. In this tactic, during the planar shifts just fly away from the platform the priest is standing on, it will kite the orbs after the drakes. The priest shouldn’t pull aggro.
Amber and Ruby Void: Are you nuts? Okay, 5 emerald drakes. No timestops. No whelp control. I’m sorry.
Tactic is to keep moving. Leech as much as you can off the boss, nightmare, heal each other if you need… Still, I’m sorry. This one is very difficult. Whelps have unlimited range so no matter what you have whelps to deal with.
As of the latest patch, rumor has it that this combination is no longer attainable. I can’t find any videos uploaded since 3.08.
Ruby and Emerald: Five yellows. Alright, you have 5 timestops, 5 shocklances, but no healer and no whelp control. Still, with the right timing, this is entirely attainable.
There are videos on youtube for all of these. Look up 5 Ruby drakes, 5 Amber drakes or 5 Emerald Drakes to find the best of them. However, again, keep in mind that the 5 Emerald does not appear to be attainable anymore.
Now, onto the biggest pain of them all.
Make it Count
20 Minutes? Seems easy enough. Hahahahaha.
Alright, so a few things to note. Drakos the Interrogator is the first boss. Before you even start make sure everyone knows what they’re doing. This is not an achievement to have people randomly decide to go for Experienced Drake Rider or any of the voids. Time is of the essence and one death of a party member could mean the difference between success and failure. Literally.
If someone dies, have them release and run back. They can catch up. Don’t wait for them. Don’t resurrect them or it’ll waste more time as they have to reobtain a drake. Be prepared to attempt this run several times, over the course of many days. If one person in the group fails, the entire group will fail.
Take your time deciding who will use what drakes. The best combination is the EZ mode, One Ruby, Two Amber, Two Emerald. Once everyone knows what their drake assignments are, mark someone to lead the way through the instance. It doesn’t have to be the tank, just someone who knows their way around.
Alright, first things first. AFTER the first boss dies, the instance becomes a race. The moment he dies the timer starts. It is recommended to have your bags open and a clear spot for the drake trinket to go so you can hotkey or put it on your action bar somewhere for easy access.
From this point on keeping the group close and making sure that you don’t pull too many drakes/whelps is key.
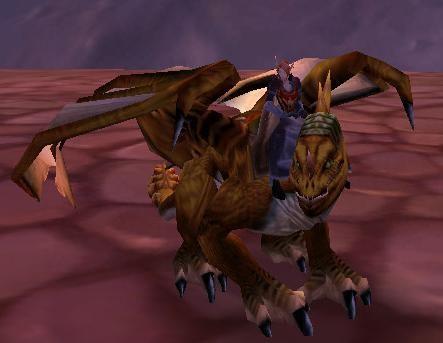
Though the drakes spawn randomly, in the run in the video above, here is a screen shot of where the drakes that needed to be killed were located.
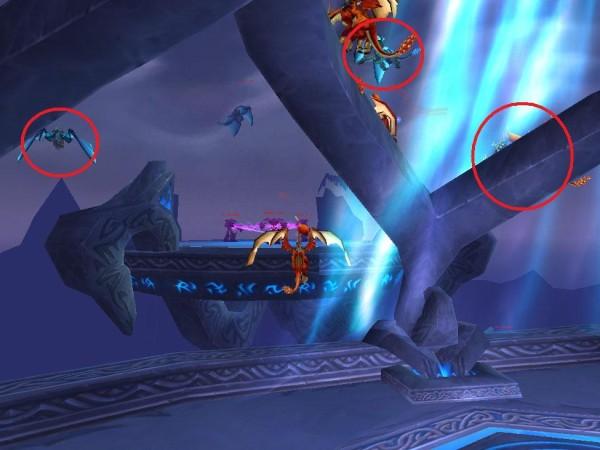
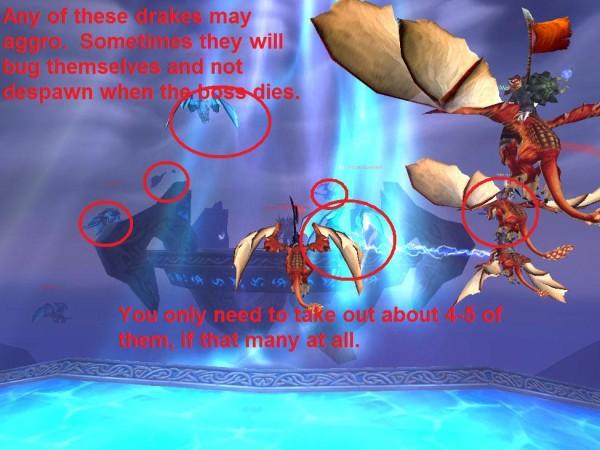
A little additional information about this image. Yes, I did circle a Ruby drake. That’s because on the other side of the drake you can barely see the tail of an Azure drake. Yes, practically all of them are circled at this platform. That is because there is a bug where some will aggro and not despawn after the fight ensuring a wipe. During the Make It Count run that I actually did, that is what happened. Luckily, we were fortunate to have made excellent time up to that point that the two minute recovery did not hinder us and we still had about 4 or 5 minutes when we got to Eregos.
Eregos himself only takes about 3 minutes to kill. It is suggested to allow 5 minutes for the fight. That way you stand a chance of ensuring success rather than guess work at whether or not you’ll be successful. If someone dies, it adds time onto the kill.
Utgarde Keep
This instance only has one achievement, and it’s very easy to get. I’m not going to waste time looking for nor making a video for it.
On The Rocks
Pretty straight forward achievement. The only thing you need to really pay attention to are AOE’s. Since Prince Keleseth summons ghoul minions it is very tempting to let them come to the boss and AOE everything down. Simply tank them away from the boss and don’t use Death and Decay, Cleave, or other AOE effects. Single target the boss, and win.
Utgarde Pinnacle
This instance has a four achievements that are a bit more complex but still excruciatingly easy. I’ll post them in order. There’s really no reason this can’t be done in one instance run.
The Incredible Hulk
Sounds easy enough. The only thing to keep in mind is you have two shots. When you enter the room, Svala and Arthas have a little chat before the ‘audience’ despawns leaving the party, a Hulk at the back of the room on ground level and one off to the right in the hallway to the next room. Pull either one.
For simplicity sake, I’ll say pull the one in the back of the room. It’s entirely plausible to have the tank handle both Svala and the Hulk without any real difficulty, but you can use an offtank if you’d prefer. Periodically throughout the encounter, Svala will ‘entrap’ a random party member on the platform and three guardians will appear as she hovers above lowering a sword.
Simply position the hulk in the center of the platform and kill the adds. Make sure the Hulk is centered when the sword hits bottom so that she kills it. Keep in mind it won’t die if it isn’t down to about 15% health, so while you’re killing the adds you can AOE the group or dps the Hulk, as my group did, at the very beginning, then just kite the Hulk around as needed.
The next two achievements can be accomplished at the same time.
Lodi Dodi We Loves Skadi
My Girl Loves to Skadi All the Time
First, to clear up confustion, Grauf is the proto-drake. Believe it or not, I’ve had someone in a PuG ask “When does Grauf spawn?” as we were doing the gauntlet.
Both of these achievements can be done at the same time fairly easily. What you will need: 5 harpoons, obtained during the gauntlet event. You will need three players to pick these up, no more than two per player as the GCD on launching the harpoons would otherwise make the third miss due to the timing.
Once everyone knows who’s grabbing harpoons and how many (since one person will only grab one), go out and start the event. Skadi will mount Grauf and fly up into the air. Ignore him for the time being. Who cares if he comes into range of the harpoons? At the moment, no one. Do the gauntlet as normal, picking up the harpoons. Once all five harpoons have been obtained, everyone runs back to the previous room, thus resetting the gauntlet event and the boss. Once the boss resets, everyone needs to hurry back out into the gauntlet area and make their way down to the end before Skadi respawns. One person then will go aggro the boss. It doesn’t matter who. This should have only taken perhaps one minute up to this point.
Since the boss has been re-aggroed, the gauntlet will begin, except you’re all now down at the end where the mobs spawn! Guess what this means! The gauntlet is over! Now the normal adds spawn. Tank and spank those as normal, keeping the three that have the harpoons near their respective launchers, avoiding the frost trails. When Skadi is in range of the launchers, everyone launch their harpoons. Only takes a few seconds.
Skadi will now land since Grauf has been killed. Tank and spank the boss, avoid the whirlwind, and win. Both achievements in one go!
The last achievement in the instance requires rapid DPS.
King’s Bane
Massive DPS is all you need. He will cast Bane after each phase. Since the phases occur on percentages, you can burn him down before he casts bane, making this a very fast fight. If he does manage to cast Bane, all DPS needs to stop immediately, including the tank.
The Violet Hold
These achievements are a pain. Not because they’re difficult, but because you never know what bosses will spawn in the instance to know what achievements you’ll get.
A Void Dance
No AoE. That’s about it, really. Single target the boss, don’t use Cleave or Death and Decay.
Defenseless
If you can’t hold all the mobs and dps them down without them getting to the door then perhaps you’re doing it wrong? The only problem I see with this is the current bug where the portal in front of Lavanthor that has the guardian fall through the floor thus becoming unkillable and adds continuously spawning.
This achievement cannot be obtained the same run as Dehydration. Or at least it would be unlikely that you get both, but it IS possible.
Dehydration
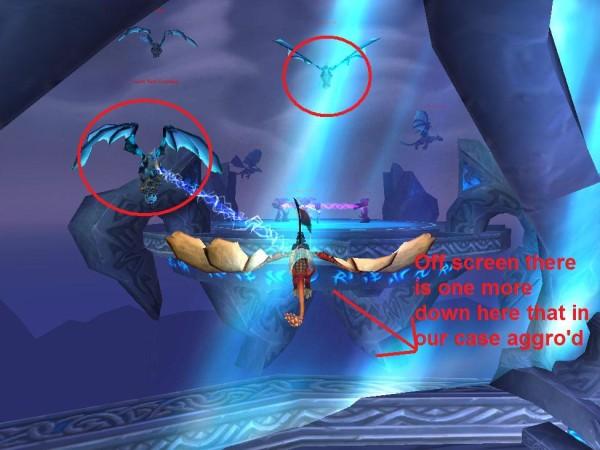
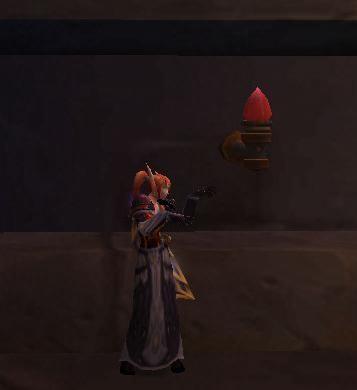
Simple, when Ichoron bursts into the Globules, use the defense crystals (they’re red and on the walls) to zap them all. Of course it IS possible to dps them all down, but since they land randomly it might be easier to just use the crystals. You will need to do this three times for each of the three changes, and thus three different crystals. In case you’re like me and didn’t even know about these crystals until you went for the achievement, here is what they look like. Make note of them when you go into the instance yourself.
Lockdown!
Obviously, this just means defeat the bosses.
There you have it. You have now attained Glory of the Hero! With it comes your nifty red proto-drake!